Manage and display Blog Authors with NetlifyCMS and Gatsby
NetlifyCMS is a great non-invasive headless CMS to use, especially when using a static site generator like Gatsby, NextJS or Hugo. Its database is completely "file based" and the authoring interface is just a little React application which you can integrate into any website easily. This means, no cms server, no licensing fees per author or server or whatsoever and no database which comes with it. But when powering a blog with NetlifyCMS, how to handle Authors writing for that blog.
Author metadata handling
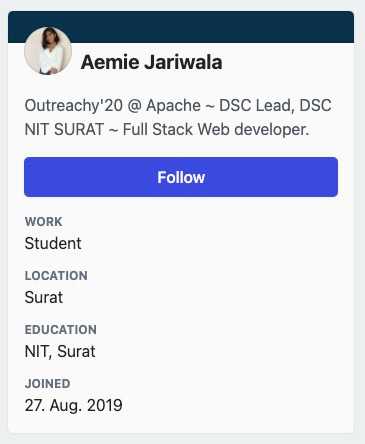
A blog normally has several authors and even if not, you need metadata for the author anyway because nearly all blogs have a section like this right below the blog article:
or an author side widget right next to your blog like this one below.
No matter what kind of visual appearance your authors will have on your site, you need more than just a name or an email from the author. And since this is nothing you want to let the author type in for every article, we need some kind of author "database". Lets create it what is called "Collections" in NetflixCMS speak.
NetflixCMS Author Collection
Assuming you already have some kind of Blog Collection in NetlifyCMS config.yml which might look like this:
- name: "blog"
  label: "Blog"
  folder: "src/pages/blog"
  create: true
  slug: "{{title}}"
  media_folder: ''
  public_folder: ''
  path: '{{year}}-{{month}}-{{day}}/{{title}}/index'
  fields:
    - { label: "Title", name: "title", widget: "string" }
    - { label: "Author", name: "author", widget: "relation",
        collection: "authors",
        value_field: "email",
        display_fields: [ "name" ],
        search_fields: [ "name", "email" ] }
    - { label: "Publish Date", name: "date", widget: "datetime",
        date_format: 'DD.MM.YYYY', time_format: "HH:mm U\\hr" }
    - { label: "Description", name: "description", widget: "text" }
    - { label: "image", name: "featuredimage", widget: image }
    - { label: "Body", name: "body", widget: "markdown" }
For the sake of simplicity i left out normally needed fields like tags, categories or whatnot. But let's focus on the author field instead. It's a field of type relation which means it relates to another collection. This authors collection will be the next todo.
  - name: authors
    label: Authors
    folder: src/pages/blog/_authors/
    media_folder: ''
    public_folder: ''
    format: json
    create: true
    slug: "{{name}}"
    fields:
      - { label: Name, name: name, widget: string }
      - { label: Title, name: title, widget: string }
      - { label: Email, name: email, widget: string }
      - { label: Shortbio, name: shortbio, widget: text }
      - { label: Image, name: authorimage, widget: image }
Now this collections contains all of the much needed author data for the various widgets we want to create on the homepage. The difference of this collection compared to the previous one is that its not a markdown collection but of format json. That means our author data will be persisted as json files.
The other interesting part from a config standpoint is in the blog collection though. Here we define the join parameters like the collection id which is "authors" and further the following:
- value_field: The field which should be put into the frontmatter section of the blog post
- display_field: The field visible in the author selection box in the author interface
- search_fields: The fields to search in when using the field search function in the author interface
After finishing the config.yml of Netlify we go to the author interface.
Authoring Interface of Netlify CMS
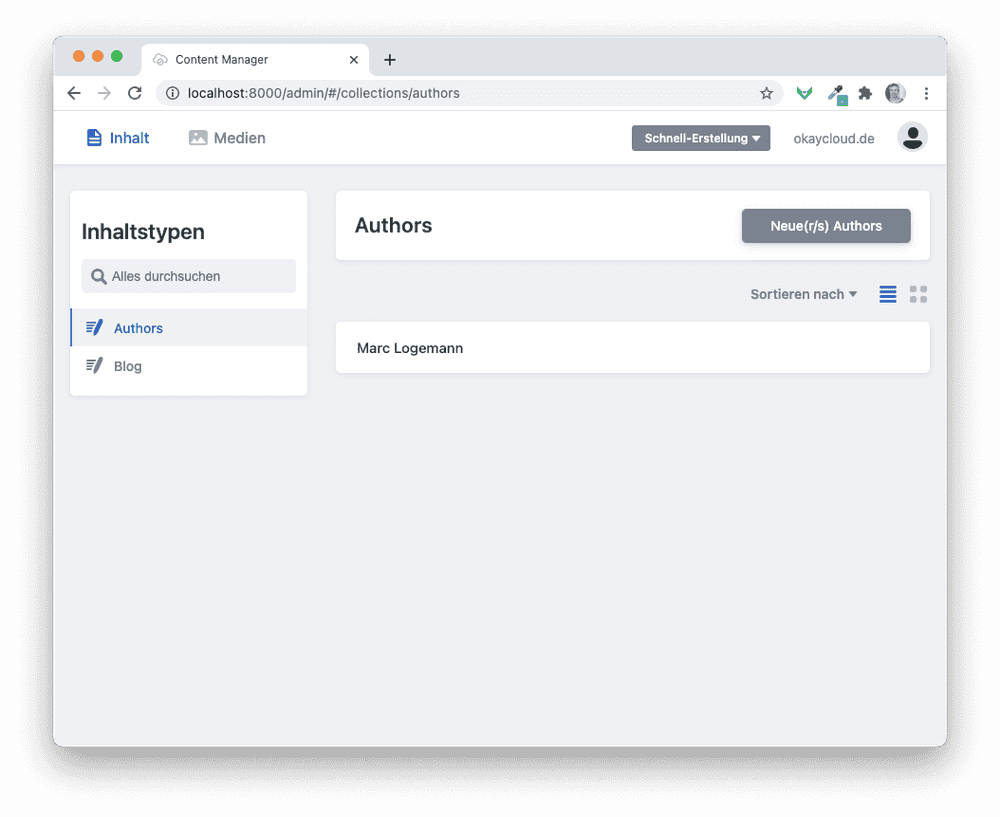
Lets have a look at the two collections and how they appear in the authoring interface.
So right there we see both of our collections now. Nothing surprising for now. Let's dive into the author collection by selection the entry already in there, which happens to be me.
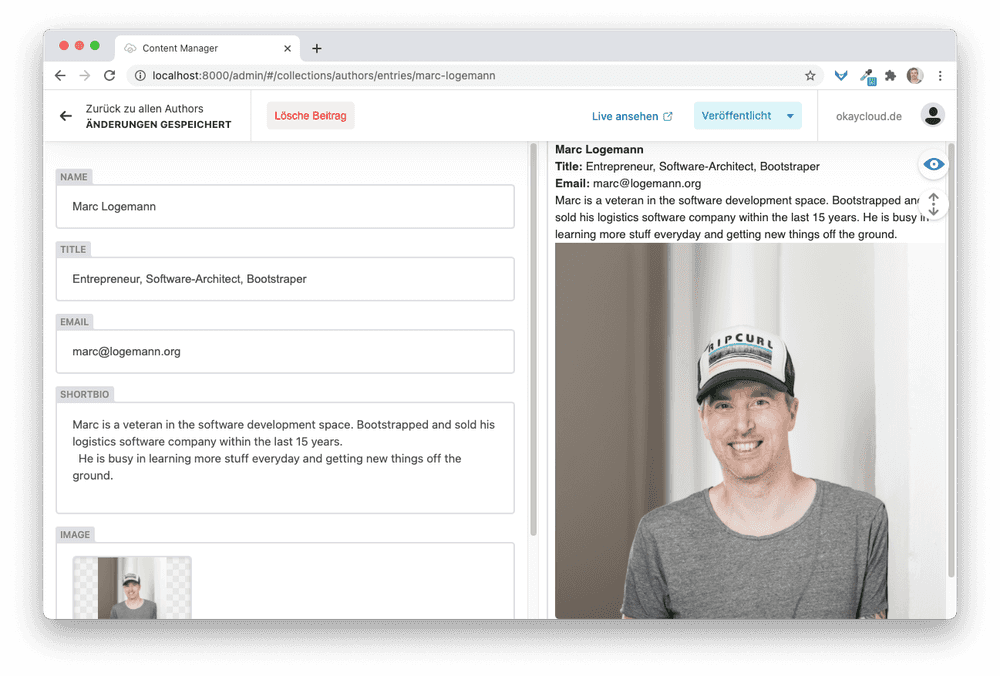
As expected you see all the configured fields for this collection in the screen. The preview section on the right is the default one provided by NetlifyCMS. In the long run it would make sense to create an individual preview page based on the visual representation of the author section on your site. Now lets see how to select the author in the blog collection, which basically is the main working area for blog authors.
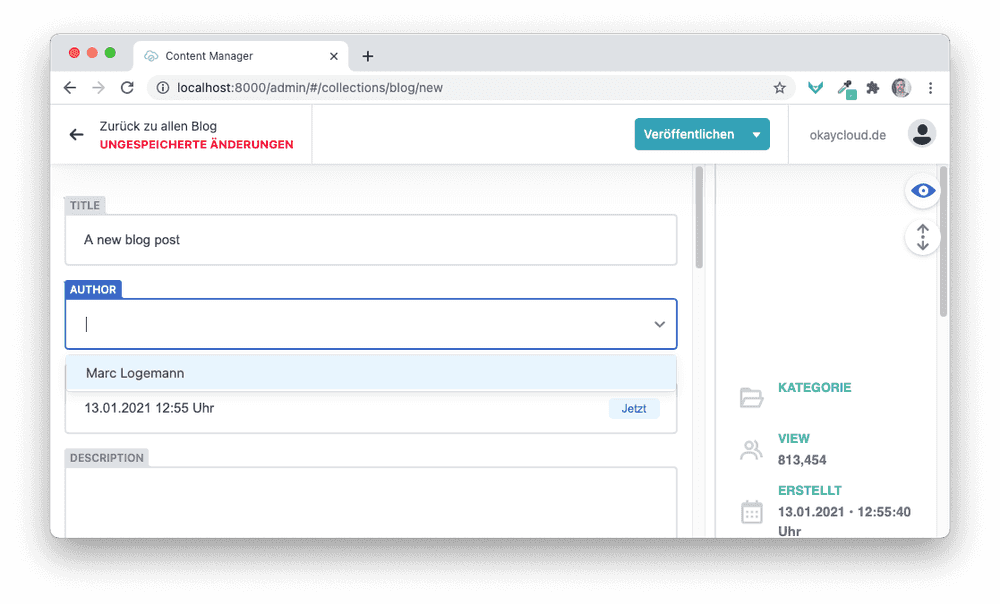
I minimized the preview pane as much as possible to have enough viewport for the fields section. Here you can simply select the author from that DropDown or search by typing in letters into the field. When typing, the fields name and email get scanned according to the configuration we made before.
When we publish a blog post, NetlifyCMS will generate the following markdown file for us. (i left out some fields like image to make this more compact).
---
title: Creating a reCaptcha Form with an AWS backend and CDK
author: marc@logemann.org
date: 2020-07-20T13:43:40.497Z
---
This is the markdown part with the blog content.
## Super nice h2 heading
You see that author has the value of value_field of the author collection in the markdown file. Thats what we configured before too. Now we have a markdown file with an email address of the author and a separate json file (in a different folder too) which contains the author data. What now?
Using Gatsby to use NetlifyCMS Collection data
I wont go super deep into how Gatsby works in general but in order to let it parse JSON and Markdown files, we need two Transformer plugins. So the needed part of the gatsby-config.js looks like this.
plugins: [{
  resolve: "gatsby-transformer-json",
    options: {
      path: `./src/pages/blog`,
    },
},
{
  resolve: "gatsby-transformer-remark"
}]
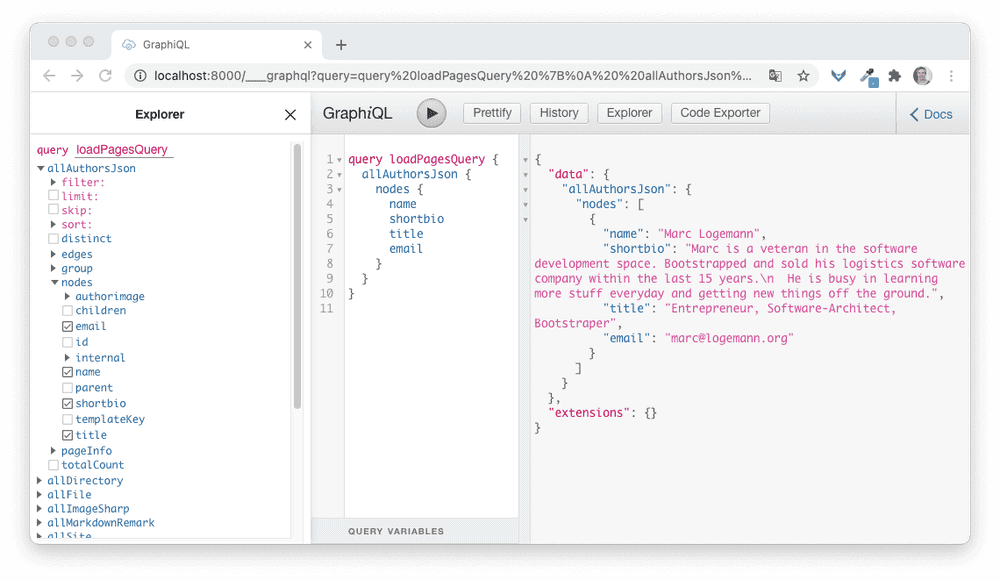
Normally you have some more plugins underneath of gatsby-transformer-remark but that's not the focus of this article. So with those transformers in place, Gatsby parse markdown files as well as json files. The files end up as nodes which you can query with GraphQL in order to create your blog pages. Lets see both data structures after starting up gatsby in the graphQL query editor:
On the left you see the tree of available graphQL schemas you can query. You see the allAuthorsJson Node expanded and by clicking some node fields, the query editor simply generates a graphQL query for us. Without suprise the data is the same as seen in the JSON file we just generated.
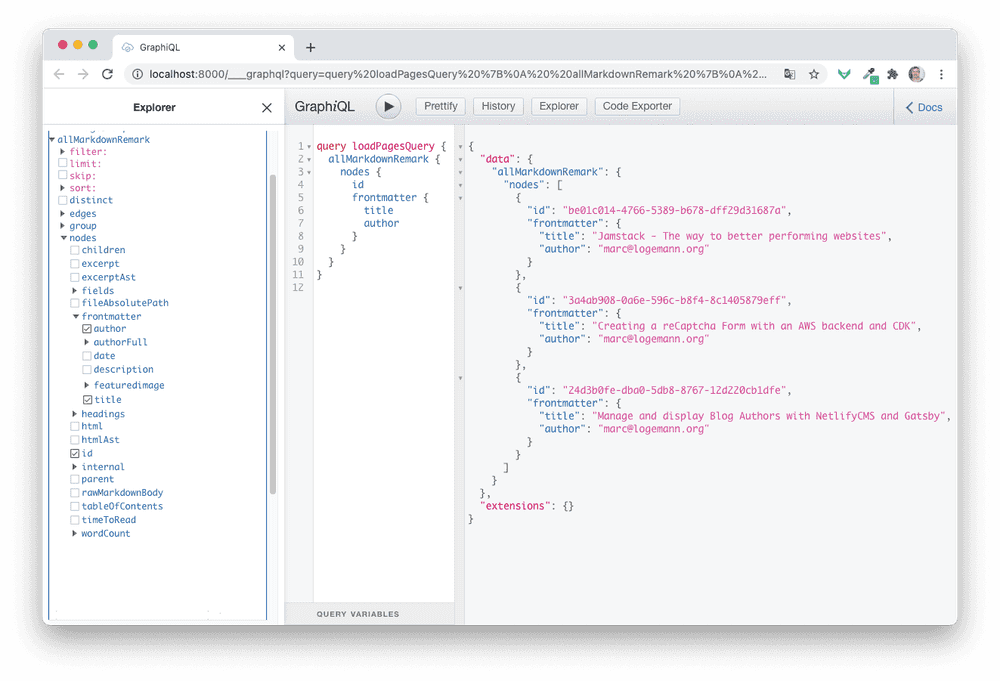
Now we do the same with the blog schema which is called allMarkdown.
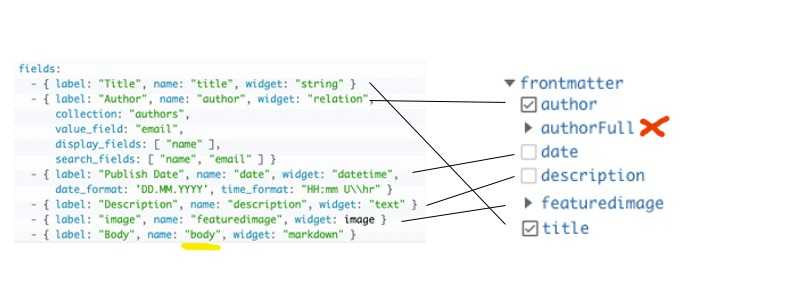
This is the representation of all of our existent markdown blog posts in the system. Take a closer look to the frontmatter node on the left. Currently i just have two fields included in the query: name & author. When comparing all fields in the frontmatter section you notice that we have nearly a 1:1 relationship with our authors NetlifyCMS Collection.
I marked two parts. The yellow field is the body part (markdown) of the NetlifyCMS config. This wont get translated to a frontmatter field because in the resulting markdown file, its also not a frontmatter field but the real body of the markdown. The more interessting part is the authorFull node marked in red. First its a node and not a field which means, if i had collapsed it before screenshotting, you would have see all the nice fields from the author collection like shortbio, authorimage and the likes. But who put that relation into the markdown Schema of gatsby?
Customize your Gatsby GraphQL Schema to include related data
Enhancing the schema to contain more fields than the default markdown fields is easy. See the following code:
exports.createSchemaCustomization = ({actions}) => {
    const {createTypes} = actions
    const typeDefs = `
    type MarkdownRemark implements Node @infer {
      frontmatter: Frontmatter!
    }
    type Frontmatter @infer {
      title: String!
      date: Date! @dateformat
      description: String!
      authorFull: AuthorsJson @link(by: "email", from: "author")
    }
  `
    createTypes(typeDefs)
}
This needs to be part of the gatsby-node.js file. Without Schema customization, Gatsby does its best to infer the schema based on the content of the data it parses from json, markdown or you feed it. I used this code for two things:
- define some fields so that they dont get infered incorrectly
- add a new schema field authorFull
Fields not defined here get infered anyway, thats what the annotation @infer is for. But focus on (2). We tell Gatsby to create a field authorFull by looking up the Schema AuthorsJson (which you can see also in the GraphQL explorer, it's the non-list version of AllAuthorsJson). We link the Authors schema into the MarkdownRemark one by telling Gatsby that the (local) field author, which contains the email of the author should be mapped to the email field of the AuthorsJson schema.
If you want to know more about the specifics, consult Foreign-Key Fields on Schema Customization on the gatsby site.
Now having the complete author data in the markdown Schema, you Blog generation method for single blog methods can simply include the authorFull fields like authorFull.shortbio. My pageQuery in the react component which resides in the /templates folder looks like this:
export const pageQuery = graphql`
  query BlogPostByID($id: String!) {
    markdownRemark(id: { eq: $id }) {
      id
      excerpt(pruneLength: 400)
      html
       fields {
        slug
      }
      frontmatter {
        date(formatString: "DD.MM.YYYY · HH:mm")
        title
        description
        tags
        category
        featuredimage {
          childImageSharp {
            fluid(maxWidth: 750) {
              ...GatsbyImageSharpFluid_withWebp
            }
          }
        }
        authorFull {
            email
            name
            shortbio
            title
            authorimage {
                childImageSharp {
                    fixed(width: 100) {
                        ...GatsbyImageSharpFixed
                    }
                }
            }
        }
        socialmediaimage {
          childImageSharp {
            fluid(maxWidth:800) {
              ...GatsbyImageSharpFluid_withWebp
            }
            resize(width: 1200) {
              src
            }
          }
        }
      }
    }
  }
`
In this case, the $id parameter will be supplied from the loop in gatsby-node.js which creates the blog pages for every found blog entry in the AllMardownRemark schema. It is the same approach as the gatsby-netlifycms-starter package has taken.
Another option would have been to also pass the authors email to this graphQL query and simply also query the authorJson schema. You know that you can query more than one schema in graphQL in one step right? This way i could have gone without the schema customization i think but you can do so much with that feature... it's handy to have this tool in you bag.
Summary
You can create quite complex data structures with NetlifyCMS without being forced to use a real server or a database engine. Together with the power of Gatsby and its underlying GraphQL processing, you can create really advanced web sites while at the same time staying away from dynamic rendering and all the related problems. Join the jamstack way of thinking.
